It’s frustrating when your pages don’t appear on Google, even after creating high-quality content and optimizing your SEO. You might see messages like “Crawled – currently not indexed” or “Not found (404)” in Google Search Console (GSC). These are clear signs of a Google indexing issue and if not fixed, your page will never show up in search results.
Don’t panic if your page isn’t showing up on Google. This is a common issue and, in most cases, it’s surprisingly simple to fix once you identify the cause.
Here I’m Usama, SEO Specialist at SEO Service Care. Over the past 1.5 years, I’ve assisted multiple clients in resolving indexing issues through Google Search Console and technical SEO audits.
This guide, based on Google’s official recommendations, expert advice from John Mueller (Search Advocate at Google), and proven SEO practices. I’ll walk you through how to identify and fix page indexing issues step-by-step. No shortcuts or black-hat methods.
How Google Crawls, Indexes, and Ranks Pages
Before addressing indexing issues, it’s important to know Google’s three-step process:
Crawling: Google’s bots explore your website by following links from page to page, discovering all available content.
Indexing: Once crawled, Google evaluates which pages are valuable and relevant, then stores this content in its database.
Ranking: Finally, Google decides which indexed pages to display in search results for specific queries, determining their order based on relevance and quality.
“Google doesn’t guarantee that it will crawl, index, or serve your page, even if your page follows the Google Search Essentials.”
[Source: developers.google.com]
In short, If Google doesn’t index a page, it won’t appear in search results. No matter how well you optimize it.
How to Identify Page Indexing Issues
Before you fix a page indexing problem, you need to know why Google is not indexing the page. Google Search Console can help you find out what is happening and why your page is missing from Google’s index.
Check the “Not Indexed” Section
- First, verify your website in GSC.
- Then go to Indexing > Pages.
There you will see which pages are not indexed and the reasons behind it. There could be multiple reasons for this issue, including:
-
Not found (404)
-
Page with redirect
-
Excluded by ‘noindex’ tag
-
Alternate page with proper canonical tag
-
Crawled – currently not indexed
-
Discovered – currently not indexed & etc.
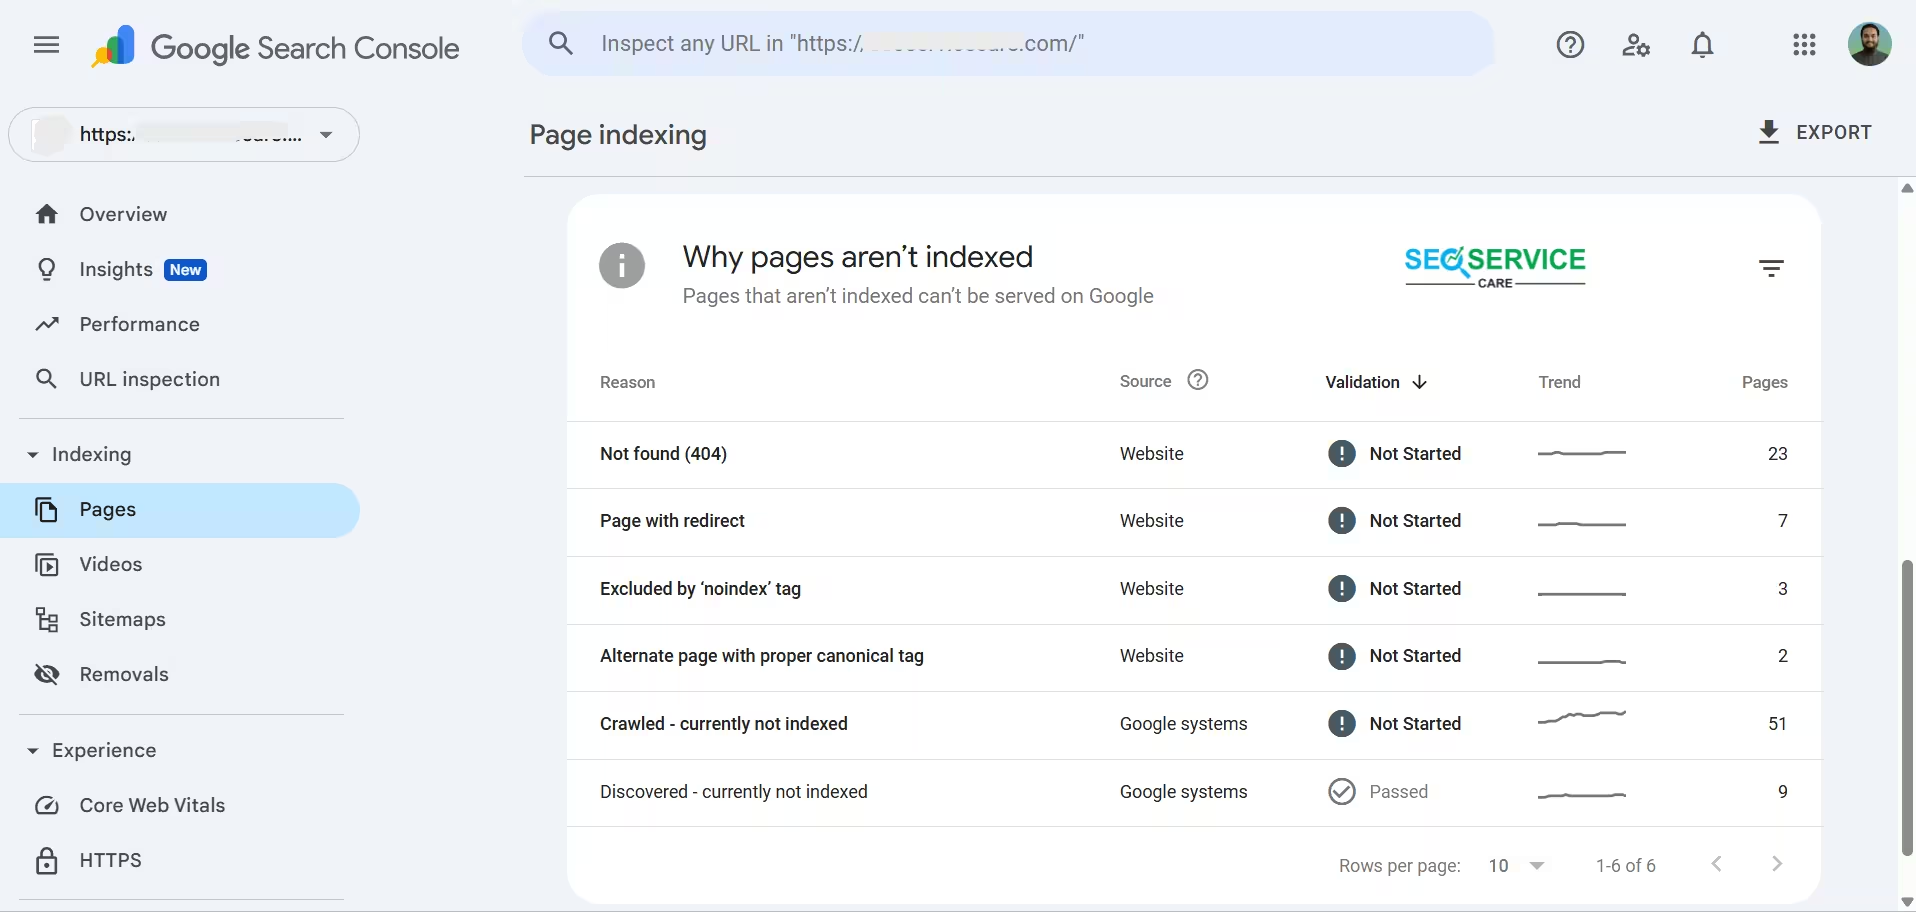
[Note: All images in this post are taken from real client projects, but website URLs and personal details have been blurred or removed to ensure confidentiality.]
The image shows a screenshot from GSC, specifically the Page Indexing report for the website.
Inspect a Specific URL
Use the URL Inspection Tool to specifically check a page.
- Go to GSC → URL Inspection Tool → enter the page URL.
You will see if the page is indexed, when Google last crawled it, and if there are any noindex tags or canonical errors.
I checked a blog post URL for one of my clients in Google Search Console. The post was about “How to Wear Headphones.”
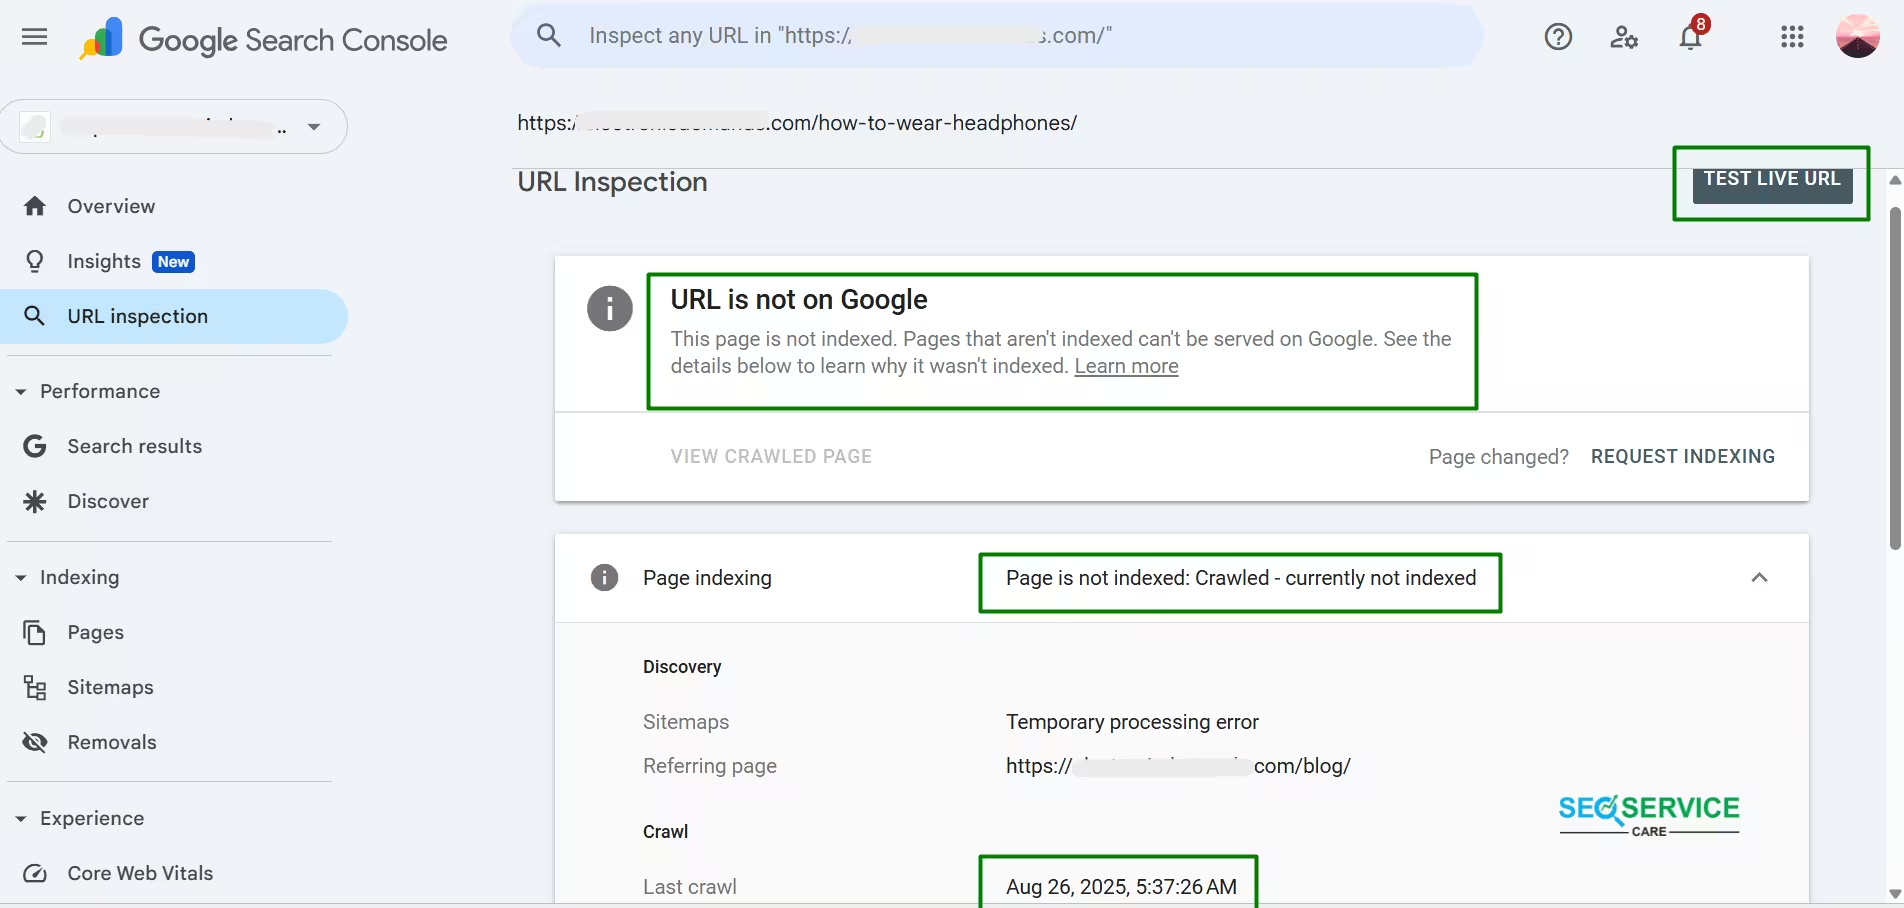
The URL Inspection tool shows that Google has crawled the page but has not yet indexed it. The status displayed is “Crawled – currently not indexed.”
Sometimes, pages are blocked by robots.txt, meta tags, or access errors, and this tool will show those issues clearly.
Use the ‘Test Live URL’ Option
Use this option to verify how Google is currently viewing your page.
Steps:
URL Inspection → Test Live URL
Check the following:
• Can Google access the page without issues?
• Is it blocked by robots.txt or a noindex tag?
• Is the canonical URL set correctly?
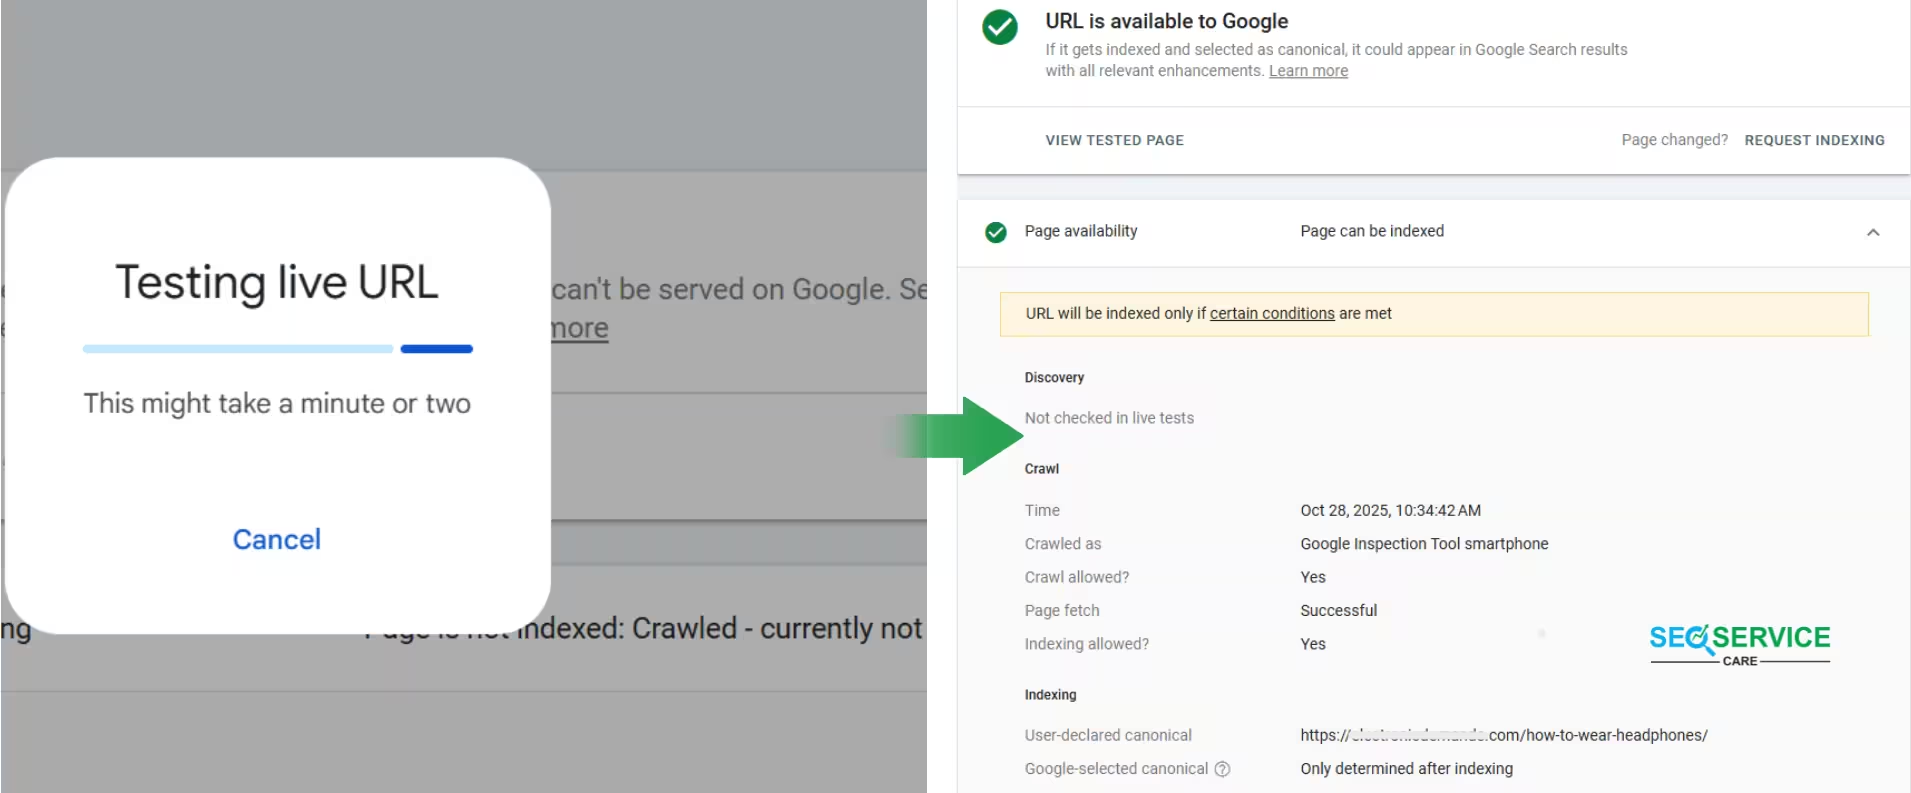
The report indicates that Google can access the page and there are no technical issues. In other words, there are no robots.txt blocks, noindex tags, or server errors. Google successfully crawled the page and was able to read its content. However, it has not yet been added to the search results.
The report also shows when Google last crawled the page and how it did so. The canonical URL for this page is set as https://main-domain/how-to-wear-headphones/. Google will decide during the indexing process whether to keep this URL as the canonical version or not.
Overall, the page is eligible for indexing, but Google has not yet added it to its index. This usually happens when the content is new, the website has a lower crawl priority, or Google does not yet consider the content significant enough to be indexed.
Compare with ‘site:’ Search
Open Google Search and enter site:yourdomain.com/page-url in the search bar.
If your page does not appear in the search results, it indicates that Google has not indexed the page yet.
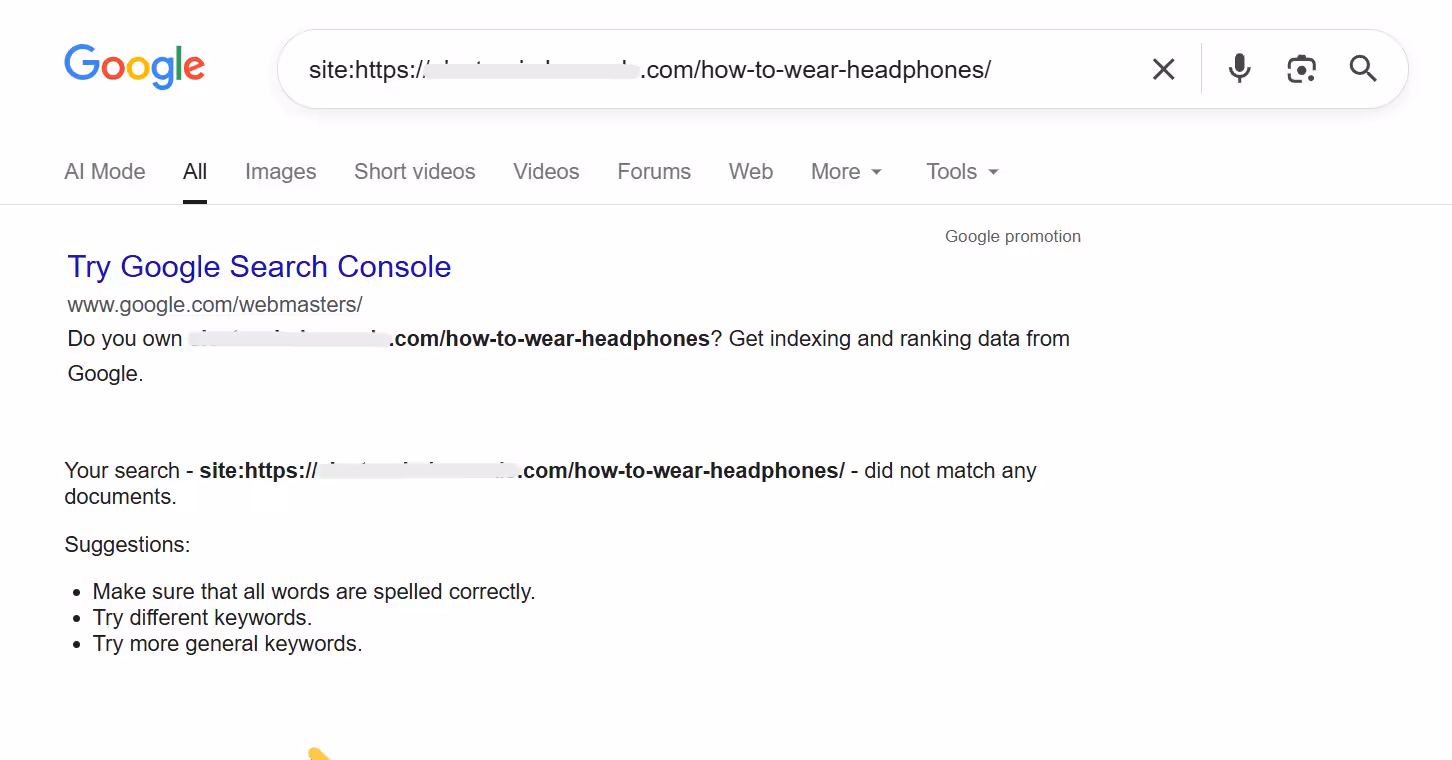
Comment: The URL displayed in the image is not yet indexed in Google.
Additionally, by using tools such as Ahrefs, Screaming Frog, or Semrush, you can gain deeper insights into which pages are being crawled by Google but are not yet indexed.
How to Fix Page Indexing Issues (using GSC)
A page indexing issue means Google has discovered the page, but did not index it. This usually happens due to signal quality, content structure, or access-related reasons. In most cases, following the right optimization and technical checks will resolve it.
Strengthen Internal Linking
When internal linking is done incorrectly, Google may fail to recognize and prioritize your important pages.
[Several indexing issues in GSC, such as 404, Crawled but Not Indexed, or Discovered but Not Indexed, are often directly tied to weak internal linking. That’s why I’m highlighting the internal linking factor first, so the rest of the explanations make more sense.]
Common Internal Linking Mistakes
-
Not linking to new or important pages from other relevant pages
-
Linking from non-indexed or low-quality pages to high-value pages
-
Repeating the same anchor text too many times, looks like keyword stuffing
-
Keeping old internal links that point to removed or 404 pages
-
Broken links caused by http to https changes or slug mismatches.
These issues signal to Google that:
“This page is not very important.”
Result:
-
Lower crawl priority
-
Slow indexing
-
In some cases, the page may not get indexed at all
Internal Linking Best Practices
The purpose of internal linking is to help Google and users understand which pages on your site are most important.
Here’s how to do it effectively:
-
Link from pages that are already indexed and getting traffic
If a page is already indexed and performing well, link from that page to your new or important page.
This passes authority and helps Google recognize the new page faster. -
Use topic-relevant anchor text
Your anchor text should clearly describe what the linked page is about.
Examples:-
Headphone Buying Guide
-
Best Noise Cancelling Headphones 2025
-
-
Ensure each important page has at least 3–5 internal links
This helps Google understand the context and importance of the page. -
Focus on contextual internal links
Besides menu or footer links, make sure to link within the content itself (e.g., from body text, related articles, product comparison sections).
Google values contextual links more. -
Fix any broken or incorrect internal links
Double-check for:-
http→ should behttps -
Missing trailing slash / (if your site structure requires it)
-
Incorrect or outdated URL slugs
-
Old URLs still being referenced
-
Even these small errors can confuse Google’s crawlers and block proper indexing. When internal linking is done correctly, Google clearly understands:
“This page is important — crawl it and index it.”
Not Found (404)
Let’s say you run a website.
One day, you notice that your blog page isn’t getting indexed on Google.
From my experience auditing multiple client websites, broken or incorrect internal links are one of the main causes of indexing or 404 issues.
You might find that your homepage and blog posts still link to:https://mywebsite.com/how-to-wear-headphones/
But the actual page has moved to:https://mywebsite.com/headphone-wearing-guide/
This kind of mismatch creates a 404 (Not Found) error, something I often see when URLs are updated without proper 301 redirects.
Simple Steps to Fix 404 Errors
1. Redirect the Old URL
Send the old page to a new, relevant one using a 301 redirect.
Example:
-
Old URL:
https://mywebsite.com/how-to-wear-headphones/ -
New URL:
https://mywebsite.com/headphone-wearing-guide/
This helps Google transfer link equity and index the new page instead of the old one.
2. Recreate the Page
If the page was deleted by mistake, recreate it with updated content.
Example:
Rebuild your “How to Wear Headphones” post with fresh tips, visuals, and improved formatting to make it more valuable for users and search engines.
3. Fix Internal Links
Internal linking optimization already discussed in Internal Linking Best Practices (see above).
4. Review External Links
If other websites are linking to the old URL, contact them and request an update to the new link.
This ensures users and Google both reach the right destination.
Soft 404
Google shows a Soft 404 when a page is technically live but fails to provide enough value to users.
In simple terms, “the page exists, but it serves no real purpose.”
Here’s how to fix it properly:
1. Improve Page Content
A soft 404 usually occurs when Google believes a page provides little value to users. This can happen if the content is very thin, repetitive, or already well-covered elsewhere. Updating the page to make it more informative, practical, and user-focused generally resolves this issue.
2. Avoid Irrelevant Redirects
One of the most common causes of soft 404s is improper redirects.
Many site owners redirect old or deleted pages straight to the homepage, thinking it’s a fix but Google often flags those as soft 404s.
Best Practice:
Instead of sending all 404s to the homepage:
-
Redirect old URLs only to closely related pages
-
If no relevant page exists, recreate the old one with updated, valuable content
This shows Google that you care about user experience, not just patching broken URLs.
3. Check Canonical Tags
Incorrect or conflicting canonical tags can confuse Google and trigger soft 404s.
Make sure each page references the correct canonical URL, not the homepage or unrelated pages.
4. Review Noindex Tags and Meta Headers
5. Re-submit in Google Search Console
After fixing content or redirects, go to URL Inspection and click “Request Indexing.”
This notifies Google that your page is now ready for re-evaluation.
Note: Soft 404s won’t hurt your site directly, but solving them ensures Google recognizes your pages as high-quality, user-focused content.
Check Noindex & Robots.txt Blocking
If an important page is not showing in Google, the first thing is to verify whether the page is being blocked from indexing.
Step 1: Check for Noindex Tag
-
Open the affected page in your browser and check View Page Source.To find it quickly, open the affected page and press Ctrl + U.
-
Look for
<meta name="robots" content="noindex">or<meta name="googlebot" content="noindex">
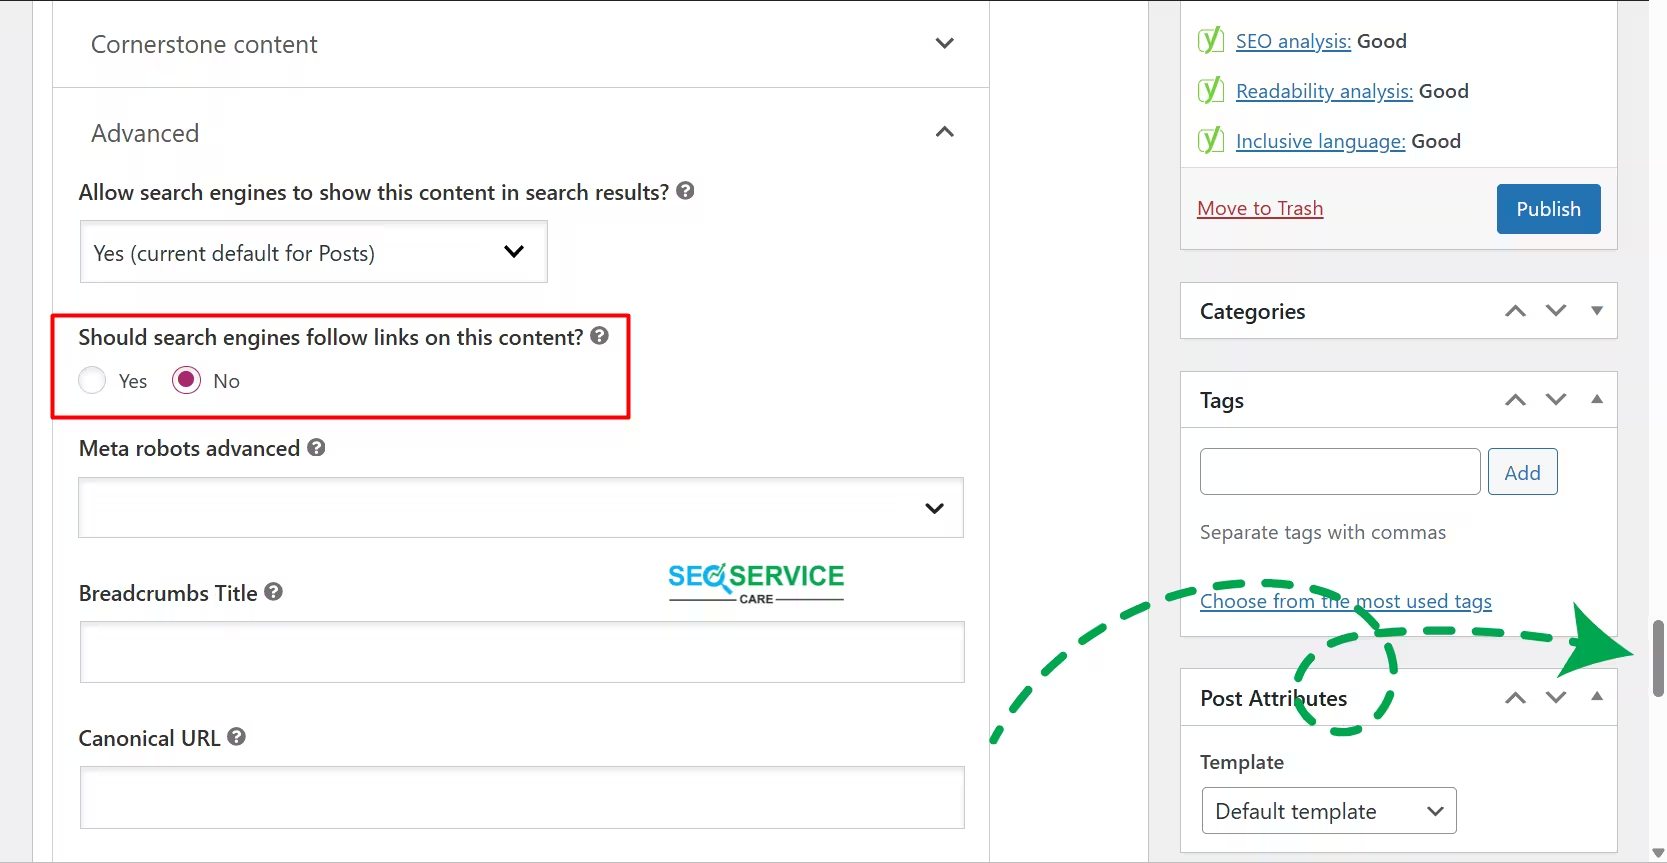
If you’re using a CMS like WordPress, check your SEO plugin settings. I’ll show you how to do it using the Yoast SEO plugin.
First, go to the Edit option of the affected post. Then, scroll down to the Advanced section at the bottom. Find the setting labeled “Should search engines follow links on this content?” If it’s set to No, change it to Yes, as shown in the image.
Step 2: Check Robots.txt Rules
Google is trying to crawl your site, but the robots.txt file is literally telling it,
“Do not enter this page or section.”
Google listens.
So the page does not get crawled.
And if it cannot crawl, it will not index.
Simple. No drama.
Sometimes this is intentional, like blocking admin folders.
But if a real, valuable page is blocked, then it becomes a problem.
How to Fix It (Straightforward)
1. Open your robots.txt file
Go to:
2. Look for lines like:
3. If the page you want indexed is listed under Disallow, remove that line.
Example Fix >>>
Before:
After:
Important note:
Just adding Allow is not enough.
You must also remove or adjust the conflicting Disallow entry.
Otherwise Google will still ignore the page.
If you’re using Yoast or RankMath, the process to fix this is basically the same as what we covered in the “Excluded by noindex Tag” section. Just open the affected post, scroll to the Advanced SEO settings, and make sure the page is set to be indexable.
Once you confirm that, adjust your robots.txt to ensure it does not block the same page. This aligns both the meta directives and the robots rules.
Align Both Settings
Make sure both the meta directives and the robots.txt rules are consistent.
If one allows indexing but the other blocks crawling, indexing will still fail.
Re-submit in Google Search Console
-
Open URL Inspection
-
Click “Request Indexing”
-
Google will know the page is ready to be indexed again
Note: Always use noindex carefully; only for low-value, duplicate, or temporary pages. Never block important pages, so Google can crawl and index them properly.
Ensure Correct Canonical Setup
A canonical tag tells Google which version of a page is the “main” or preferred one.
If it points to the wrong URL, Google might index the incorrect page which can hurt your SEO visibility and authority.
Let’s look at a quick example:
1. Suppose your main blog post is:
2. You also have a printer-friendly or duplicate version:
3. If the duplicate page’s canonical tag points to itself or the wrong URL, Google may index that version instead of the original.
Result: your main page loses its ranking potential.
4. To fix it, add the correct canonical tag on the duplicate page:
What this does:
-
Tells Google the primary version is
headphone-guide -
Prevents duplicate pages from being indexed
-
Consolidates all ranking signals to the main page
In short: Always point duplicate or alternate versions to the correct canonical URL. Double-check that every canonical tag matches the page you want indexed. This helps Google understand your preferred content and maintain stronger SEO performance
Discovered – Currently Not Indexed
This status means Google is aware of your page (it has discovered it) but hasn’t crawled or indexed it yet. This usually happens when Google finds many pages on your site and, due to crawl budget limits, decides to delay crawling some of them.
To fix this, begin by strengthening internal linking (see Internal Linking Best Practices above, i have alreadydiscussed). This increases the page’s perceived importance in the site structure.
This helps Google understand that the page is part of your site’s structure and holds importance within your content network.
Next, evaluate and improve content depth. Quality content increases the likelihood of Google choosing to crawl and index it.
Finally, maintain a healthy crawl budget by removing or noindexing low-value or duplicate pages. When Google does not waste resources on unnecessary pages, it can focus on indexing your important content more efficiently.
Point to be noted: Google does not index every page by default, but pages that demonstrate strong internal relevance, clear value, and good technical performance are indexed much faster. By strengthening these signals, you could significantly increase the chances of your page appearing in Google search results.
Crawled – Currently Not Indexed
This status means Google already crawled the page, but chose not to add it to the index yet.
In other words, Google saw the content, but didn’t find enough unique usefulness.
This issue is similar to “Discovered but Not Indexed”, but with one key difference: Here the page was already crawled, yet Google decided not to index it.
Most solutions are similar to the previous indexing issues, but here are some specific improvements to focus on for this case:
1. Add Unique, First-Hand Value
Google skips pages that feel generic or similar to others already indexed. Expand the content with helpful details, examples, FAQs, or visuals. Demonstrate real experience or expertise in the topic.
Improve the page by adding:
-
Real examples or case studies
-
Updated data or statistics
-
Unique comparison tables
-
Personal or professional insights
Example: Instead of just listing “10 SEO tips,” include real data or screenshots from your analytics results showing how those tips improved performance.
2. Strengthen Signals That the Page Matters
(Internal linking best practices already discussed earlier, apply them here.)
Additionally:
-
Ensure the page is included in your XML sitemap
-
Share the page on channels where engagement occurs. Example: When you share a page on social platforms, Google can discover it faster, which may help speed up crawling.
3. Trim Low-Value or Repetitive Sections
If a page contains filler or repeated paragraphs, Google may treat the entire page as low-value.
Remove anything that does not directly help the reader/visitor.
4. Check for Crawl Rendering Issues
Sometimes Google crawls the URL but cannot properly process the content.
Use:
Google Search Console > URL Inspection Tool
Check “Crawled Successfully?” and Rendered HTML preview.
If JS or server delay affects rendering, fix it accordingly.
Sitemap Issues
A sitemap doesn’t guarantee page indexing, but it shows Google which pages are most important and how to crawl them.
Common Sitemap Problems
-
Outdated URLs: Pages that no longer exist or return 404 errors.
-
Non-Canonical URLs: URLs that point to other canonical pages.
-
Blocked URLs: Pages blocked by
robots.txtornoindextags. -
Incorrect XML Format: Missing
<loc>tags or structural errors. -
Oversized Sitemap: More than 50,000 URLs or over 50 MB in size.
How to Fix Sitemap Issues
Validate Your Sitemap
Go to Google Search Console > Sitemaps and check for any “Couldn’t fetch” or “Error” messages.
You can also validate it using an external tool like XML Sitemap Validator.
Remove Broken or Invalid URLs
Keep only live (200-status) URLs in your sitemap.
Example:
If /old-blog-post/ now redirects to /new-blog-post/, remove the old URL from your sitemap.
Include Only Indexable URLs
Exclude any URLs that are:
-
Blocked by
robots.txt -
Tagged with
noindex -
Canonicalized to another page
Enable Auto-Update for Your Sitemap
If you’re using WordPress, make sure your SEO plugin (like Yoast SEO or RankMath) automatically updates the sitemap whenever you publish or delete a post.
Example: https://yourdomain.com/sitemap_index.xml
Resubmit the Sitemap in Google Search Console
Once updated, go to Search Console > Sitemaps and resubmit it.
Check the “Last read” date. If it’s recent, Google has successfully re-crawled your sitemap.
In GSC’s Pages report, verify that the URLs listed in your sitemap are actually being indexed.
My suggestion:
For large websites, it’s best to split sitemaps by type, for example:
-
/blog-sitemap.xml -
/product-sitemap.xml
This improves crawl efficiency and ensures your most valuable pages get indexed faster.
5xx Server Errors
Google Search Central clearly states that server errors directly block crawling and affect a page’s indexability.
First, you need to log in to your hosting provider’s dashboard. Most hosting services, like cPanel, Plesk, or other custom control panels, have a section called Metrics or Logs. There, you can find the Error Logs option.

Each entry in the Error Logs will show which page or file encountered a problem during crawling. For example, if you’re getting a 500 Internal Server Error while loading https://mywebsite.com/blog-post, the log will indicate which file or line caused the fatal error. For instance, it might say: single.php line 120: Fatal error.
This means a fatal error occurred on line 120 of the single.php file. It indicates that there’s an issue with the theme’s code or a plugin.
After that, you can fix the file or the specific piece of code. Start by taking a backup of the file. Then identify which function or variable is causing the issue on that line. For example, if the code contains:
There is a typo here. Instead of headphons, it should be headphones. Correcting the typo would resolve the error. In the same way, you may need to replace deprecated functions or update or deactivate a plugin if it is causing the problem.
If a 502 Bad Gateway error appears and the issue resolves after deactivating a specific plugin (such as “SEO Plugin X”), it indicates a plugin conflict. Updating or reinstalling the plugin typically fixes the issue and restores normal page loading.
In the case of 503 or 504 errors, the issue is usually related to server resources. Increasing the server’s RAM or CPU, restarting the server, or contacting your hosting provider can help resolve it. Misconfigured CDN or firewall settings can also trigger 503/504 errors. For example, if you’re using Cloudflare, you may need to adjust the Page Rules to increase the timeout limit or perform a cache purge.
Once you fix everything, use the URL Inspection Tool in Google Search Console to check the page and request indexing. This notifies Google that you have made the page ready for indexing.
Expert Tip: 5xx errors not only affect indexing but also impact user experience. Consistently monitoring your server, hosting, theme, plugins, and CDN is crucial for maintaining good SEO. After resolving these issues, the page re-enters Google’s crawl and indexing process, helping restore indexing and improve overall SEO performance.
JavaScript Rendering Issues
Modern websites often rely heavily on JavaScript to display dynamic content such as product details, reviews, or interactive sections. However, if Googlebot cannot properly render your JavaScript, it may miss those sections, preventing Google from indexing them.
How to Fix JavaScript Rendering Problems
Implement Server-Side Rendering (SSR) or Dynamic Rendering
Instead of relying on the browser, render your page content on the server and deliver a complete HTML version to Google.
Frameworks like Next.js, Nuxt.js, and Angular Universal support this by default.
Example:
If your product details appear only after clicking a “View Details” button, SSR includes that information in the HTML before Google crawls it.
Ensure Important Content Loads Without User Interaction
Google doesn’t click buttons or scroll infinitely.
Make sure key content such as headings, text, and links appears immediately during the initial load.
Avoid Delayed or Conditional Rendering
Scripts that load after a delay or depend on third-party resources may time out before Google finishes rendering.
Keep essential scripts lightweight and prioritized early in the load process.
Test Again Using the URL Inspection Tool
After making changes, re-check the rendered version in Google Search Console and click Request Indexing.
If the rendered HTML now matches what users see, the problem is resolved.
Optimize JavaScript and CSS Delivery
Minify and combine files, and defer non-critical scripts.
This not only improves rendering and crawlability but also enhances page speed and user experience.
Take note of this: Googlebot uses the Web Rendering Service (WRS). Which sometimes delays JavaScript rendering for several days.
That’s why pre-rendering or SSR is the most reliable way to ensure your content is visible to Google immediately. That will improving both crawl efficiency and indexing speed.
FAQ’s About Google Indexing Issue
Q . 1: How to fix page is blocked from indexing?
Check for robots.txt rules, meta noindex tags, or other restrictions and remove them to allow Google to index the page.
Q . 2: What do page indexing issues mean?
Page indexing issues happen when Google hasn’t added your page to its search results yet. This can occur if the page is new, missing from your sitemap, or if Google hasn’t found a link to it. Even after requesting a crawl, it can take a few days to weeks for new pages to appear in search results.
Q . 3: Can I pay Google to rank my website higher?
No, you cannot pay Google to improve your organic search rankings. Google ranks pages based on relevance, quality, and user experience, not payment. Paid ads, like Google Ads, are separate from organic search results.
Closing Remarks
Page indexing issues are common but fixable. By carefully checking for noindex tags, robots.txt blocks, canonical errors, broken links, and content quality, you can guide Google to properly crawl and index your pages. Combine this with strong internal linking, optimized sitemaps, and error-free server setup to improve your site’s visibility.
Regularly checking these factors helps your content show up in search and stay useful to users.